


In this post, we will guide you through creating a simple mobile chat application. The application uses Amazon Bedrock to generate AI-powered chat features and enhance user experiences.
The sample application will include:
- A mobile application using custom JavaScript XML (JSX) components to create the user interface.
- Seamless end-user chat interactions integrated with Amazon Bedrock foundational models.
- Backend development powered by AWS Amplify.
- Implementation of RESTful APIs using Amazon API Gateway for communication.
- Serverless backend processing using AWS Lambda.
Architecture
Figure 1 illustrates the architecture and process flow for running a React Native mobile application backend in the AWS Cloud.

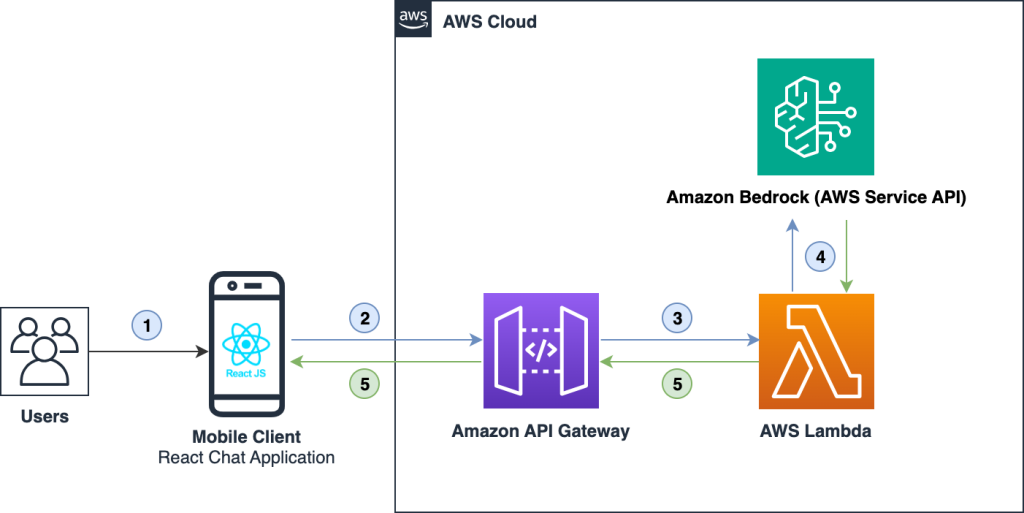
Figure 1: Flow of a mobile chat application using AWS services.
- Users access the application from their mobile devices.
- The mobile client React chat application interfaces with Amazon API Gateway.
- Amazon API Gateway interacts with AWS Lambda to post and fetch the data.
- AWS Lambda interacts with one of the Amazon Bedrock AI models and returns the generated response in a JSON format.
- The processed data is then returned to the frontend for display, facilitating content or chat presentation.
Note: This tutorial was built on a Macintosh and uses the macOS terminal for command execution. If you are using either Windows or Linux operating system, use the equivalent commands.
Prerequisites
To follow this tutorial, use following prerequisites.
- An AWS Account with access to:
- AWS Identity and Access Management (IAM): Manage user permissions and access control for your AWS resources.
- AWS Amplify: Accelerate your full-stack web and mobile app development with AWS Amplify. Easy to start, easy to scale.
- Amazon API Gateway: Amazon API Gateway is a fully managed service that makes it easy for developers to create, publish, maintain, monitor, and secure APIs at any scale.
- AWS Lambda: Run code without thinking about servers or clusters.
- Amazon CloudWatch: Observe and monitor resources and applications on AWS, on premises, and on other clouds.
- Amazon Bedrock: The easiest way to build and scale generative AI applications with foundation models. Amazon Bedrock requires approval submission for AI21 models.
- Node.js v18 or higher installed.
- Xcode or Android Studio.
- The latest Amplify CLI version installed and configured.
- Open a terminal session and run
npm install -g @aws-amplify/clito update to the latest Amplify CLI. - If you haven’t configured the Amplify CLI yet, follow the steps provided in the document, Set up Amplify CLI.
- Open a terminal session and run
- Set up your development environment for React Native version 0.73 by following the instructions in the document, Setting up the development environment.
Start your application
Navigate to the root folder of your application and execute the following command to start the application, if it is not already running.
npm run iosUpon successful execution, you will see your new application running in the iOS Simulator, as shown in Figure 2.

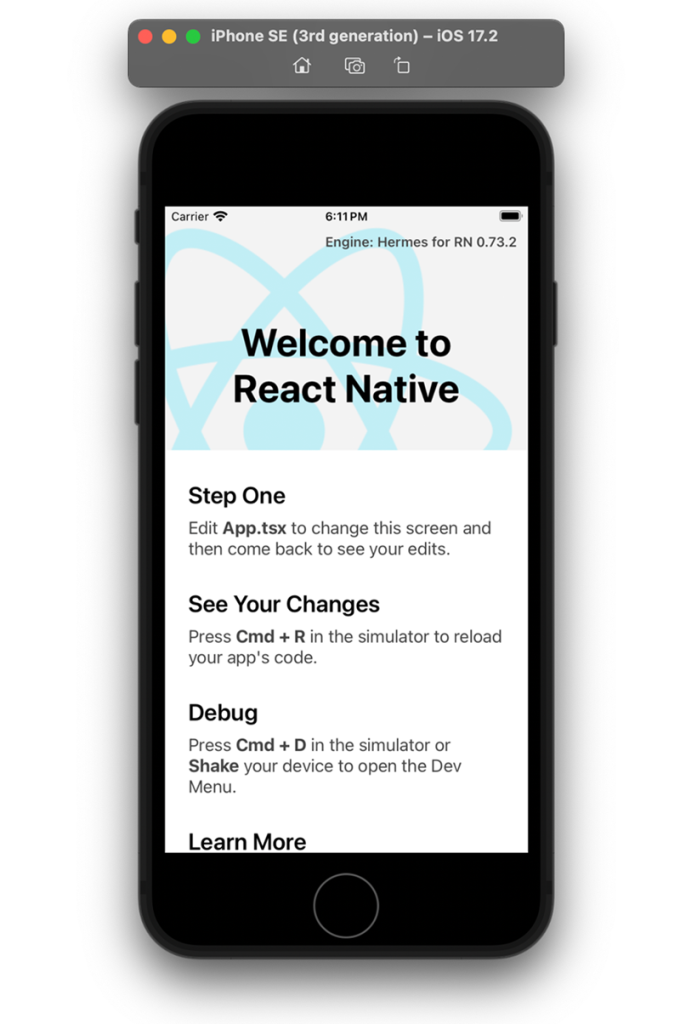
Figure 2: New application running in the iOS Simulator
Set up the backend environment
Open a new terminal window from the root project directory. Initialize Amplify by executing the following command.
amplify-initFor this example, accept all of the default values. The selection and output should look similar to this.
? Enter a name for the project (amplifyBedrockChat)
? Enter a name for the environment (dev)
? Choose your default editor: (your editor type)
? Choose the type of app that youre building (javascript)
? What javascript framework are you using (react-native)
? Source Directory Path: (src)
? Distribution Directory Path: (/)
? Build Command: (npm run-script build)
? Start Command: (npm run-script start)
? Do you want to use an AWS profile? (Yes)
? Please choose the profile you want to use: (default)
When you initialize a new Amplify project, the following occurs.
- A top-level directory is created called amplify that stores your backend definition. As you add features, the amplify folder will grow with infrastructure-as-code templates that define your backend stack.
- A file named amplifyconfiguration.json is created in your designated source directory path that holds all the configuration for the services you create with Amplify. This is used by the Amplify JavaScript client library to retrieve the information needed to connect to your backend services.
- It modifies the. gitignore file, adding some generated files to the ignore list.
Open the project root with the IDE of your choice.
Add API
Run the below command to add the API. The selection and output should look similar to this.
amplify add api? Select from one of the below mentioned services: REST
✓ Provide a friendly name for your resource to be used as a label for this category in the project: · bedrockchatapi
✓ Provide a path (e.g., /book/isbn): · /chat
? Provide an AWS Lambda function name: amazonbedrockchatmobaaccfc2f
? Choose the runtime that you want to use: Python
? Do you want to configure advanced settings? No?
? Do you want to edit the local lambda function now? Yes
✓ Restrict API access? (Y/n) · no
✓ Do you want to add another path? (y/N) · no
Note: For this tutorial, API access is not restricted.
Keep the code snippets handy
The complete code snippets are available at amazon-bedrock-react-native-chat-app, keep them ready for easy copying and pasting.
Update the code in index.py file
To update the index.py file and include the provided code, follow these steps.
- Open the [project-repository]/amplify/backend/function/function-name/src/index.py file.
- Copy the entire code snippet from the demo repository for the index.py component and paste it into your newly created index.py file.
def handler(event, context):
    try:
        ...
        body = json.loads(event.get("body"))
        prompt_message = body.get("message", "hi")
        new_body =
            "prompt": prompt_message,
            ...

        response = bedrock.invoke_model(
            body=json.dumps(new_body),
            modelId=modelId,
            ...
        )
        ...
        return response_body}
This code implements the following.
- Imports the necessary libraries.
- Configures the Amazon Bedrock Runtime.
- Utilizes the AI21 model for this demo application.
- Extracts the message input from body if provided, else uses the default message.
- Invokes the Amazon Bedrock model with set of parameters.
- Processes and returns the response.
Update Python runtime and add the policy
The Amazon Bedrock Runtime service is available in python 3.12 runtime version. To accommodate the availability of the bedrock-runtime service in the latest AWS SDK for Python (Boto3), follow these steps to update the Python version and add a custom policy statement to invoke the Amazon Bedrock model.
- Update Python version
- Open the file amplify/backend/function/[function-name]/[function-name]-cloudformation-template.json.
- Locate the Runtime section.
- Update the Runtime to python3.12.
"Runtime": "python3.12"
- Locate the “lambdaexecutionpolicy” section. Under Properties > PolicyDocument, add the following custom policy statement to grant permission to invoke the “ai21.j2-ultra-v1” Amazon Bedrock foundation model:
    "Effect": "Allow",
    "Action": "bedrock:InvokeModel",
    "Resource": "arn:aws:bedrock:us-east-1::foundation-model/ai21.j2-ultra-v1"
Deploy your changes to the AWS Cloud
Next, deploy the backend using the Amplify CLI.
amplify pushThis will result in the following actions.
- Amplify will deploy your backend resources, including AWS Lambda functions, API Gateway configurations.
- The Lambda function associated with your Amazon Bedrock model will be updated to use Python version 3.12.
- The IAM role, LambdaExecutionRole, associated with the Lambda function will be modified to include the AmazonBedrockFullAccess policy. This grants the Lambda function the necessary permissions to invoke the Amazon Bedrock model.
- Amplify utilizes AWS CloudFormation to manage your backend infrastructure. During the Amplify push process, CloudFormation templates will be updated to reflect the changes made to your Lambda function and IAM role.
- AWS services such as Lambda and IAM will be provisioned or updated based on the changes specified in your CloudFormation templates.
Frontend development
Make the following changes in the frontend code.
Install packages
Run the following command to install the required packages.
npm install aws-amplify @aws-amplify/react-native @react-native-community/netinfo @react-native-async-storage/async-storage react-native-get-random-valuesUpdate iOS deployment target
- Navigate to the ios directory and open the Podfile.
- Find the line and replace the code as shown.
original code – platform :ios, min_ios_version_supported
replace with – platform :ios, 13.0
Install pod dependencies for iOS
Run the following command to install pod dependencies for iOS.
npx pod-installNote: Ensure you also install @react-native-async-storage/async-storage and react-native-get-random-values to avoid runtime errors.
Update index.js file
To update the index.js file, open the file from the root folder and add the provided code snippet:
// other imports...
import  Amplify  from 'aws-amplify';
import amplifyconfig from './src/amplifyconfiguration.json';
Amplify.configure(amplifyconfig);
// Rest of the code...
This configuration sets up Amplify in your React Native application using the settings provided in the amplifyconfiguration.json file. Refer the demo code snippet
Create header component
To create the Header.jsx file and include the provided code, follow these steps.
- Inside the src/components/ folder, create a new file named Header.jsx.
- Copy the entire code snippet from the demo repository for the Header.jsx component and paste it into your newly created Header.jsx file.
...
const AppHeader = (title) =>
  return (
    <View style=styles.wrapper>
      <Text style=styles.appTitle>title</Text>
    </View>
  );
;
...
Now, you have successfully created the Header.jsx component that displays a header with a customizable title.
Create avatar component
- Inside the src/components/ folder, create a new file named Avatar.jsx.
- Copy the entire code snippet from the demo repository for the Avatar.jsx component and paste it into your newly created Avatar.jsx file.
...
const Avatar = (isUser) =>
  ...
  return <View style=[avatarStyle]>icon</View>;
;
export const UserAvatar = () =>
  return <Avatar isUser=true />;
;
export const ChatBotAvatar = () =>
  return <Avatar isUser=false />;
;
The Avatar component dynamically renders avatars for the user and chat bot.
Create ChatInput component
- Inside the src/components/ folder, create a new file named ChatInput.jsx.
- Copy the entire code snippet from the demo repository for the ChatInput.jsx component and paste it into your newly created ChatInput.jsx file.
...

const ChatInput = ( value, onChangeText, onSend, placeholder ) => (
  <View style=styles.container>
    <TextInput
      style=styles.input
      placeholder=placeholder
      value=value
      onChangeText=onChangeText
    />
    <Button title="Send" onPress=onSend />
  </View>
);

...
The ChatInput component provides a user interface for entering and sending messages in a chat application. It consists of a text input field for typing messages, accompanied by a Send button to trigger the message sending action.
Create message bubble component
- Inside the src/components/ folder, create a new file named MessageBubble.jsx.
- Copy the entire code snippet from the demo repository for the MessageBubble.jsx component and paste it into your newly created MessageBubble.jsx file.
...

const MessageBubble = ( item ) => {
...
  return (
    <View style=...>
      item.sender === 'bot' && avatarComponent
      <View style=messageContainerStyle>
        <Text style=messageTextStyle>item.message</Text>
      </View>
      item.sender === 'user' && avatarComponent
    </View>
  );
;

...
The MessageBubble component renders chat message bubbles in a chat application, dynamically styling them based on the sender (user or bot). It integrates user and chat bot avatars alongside the message text, offering a visually distinct and organized representation of chat interactions.
Create chat component
- Inside the src/components/ folder, create a new file named Chat.jsx.
- Copy the entire code snippet from the demo repository for the Chat.jsx component and paste it into your newly created Chat.jsx file.
...
const ChatComponent = () =>
  ...
  const fetchAPI = async (message) =>
    ...
  ;
  const handleSend = () =>
    ...
  ;

  return (
    <View style=styles.container>
      <FlatList
        data=messages
        ...
        renderItem=renderMessage
      />
      <ChatInput ... />
    </View>
  );
;
...
The chat component functionality:
- Manages chat messages and user input.
- Uses state to store messages and the current input.
- Handles sending messages, fetches bot responses from an API, and renders messages using MessageBubble.
- The user interacts through the integrated ChatInput.
Create API service
- Inside the src/services/ folder, create a new file named api.js.
- Copy the entire code snippet from the demo repository for the api.js component and paste it into your newly created api.js file.
- Replace the apiUrl with Amazon API Gateway provided URL.
...
const apiUrl="replace-api-path’;
const fetchChatAPI = async message =>
  try
    const response = await axios.post(apiUrl,
      message: message,
    );
    ...
   catch (error)
    ...

;
...
This service utilizes Axios to make a POST request to the specified API endpoint, handling responses and errors appropriately. The fetchChatAPI function returns a promise that resolves to the bot’s response. Any errors during the API request are logged and handled using the handleFetchError function.
Update the App component
To update the App.jsx component and incorporate the provided code, follow these steps.
- Navigate to the src/components/ folder and locate the App.jsx file.
- Copy the entire code snippet from the demo repository for the App.jsx component and paste it into your existing App.jsx file.
import React from "react';
import Header from './src/components/Header';
import ChatComponent from './src/components/Chat';

const App = () =>
  return (
    <>
      <Header />
      <ChatComponent />
    </>
  );
;

export default App;
Run your React Native application in the simulator.
The App.jsx component is updated with the provided code. You can open the app in the simulator, enter text, select the Send button, and receive responses from the Amazon Bedrock model. Make sure to check the provided screenshot (Figure 3) as a reference for the expected output.

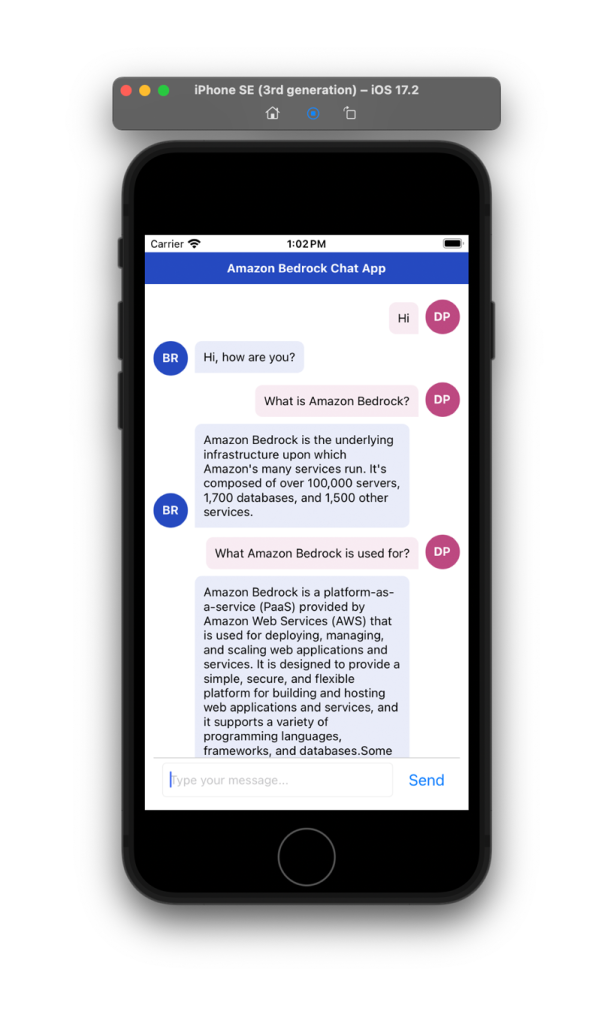
Figure 3: Amazon Bedrock chat application user interface
Conclusion
In this blog post, we have guided you through the development of a simple chat application for the mobile platform using Amazon Bedrock, a powerful tool that leverages generative AI models for enhanced user experiences. By integrating Amazon Bedrock into your React Native application, you’ve explored the seamless orchestration of AWS services including AWS Amplify, Amazon API Gateway, and AWS Lambda.
Throughout the post, you have made key configurations such as updating Python versions, adjusting AWS Lambda execution roles, and incorporating necessary dependencies for both the backend and frontend. The provided code snippets for components like Header, Avatar, and ChatInput, coupled with the demonstration of Amazon Bedrock’s capabilities, offer a comprehensive understanding of building AI-powered applications.
Amazon Bedrock, with its underlying AI21 models, enables your chat application to process and respond intelligently to user inputs. The flexibility and ease of integration showcased in this tutorial underscore the potential of Amazon Bedrock for developers seeking to enhance their applications with advanced conversational AI.
About the Author
link